Configure Postman to use Azure AD authorisation code flow on-behalf-of a user identity
March 01, 2022 • 5 min readIntroduction
In this post, we will explain how to configure Postman to use Azure Active Directory Authorisation Code Flow to authenticate as a user within your organisation, obtain an access token with the required scope on their behalf and then invoke the WebAPI using that access token.
There are a few steps required to achieve this, namely:
- Create an application registration for Postman to use to authenticate the user using the Authorisation Code flow.
- Configure the Authentication options in Postman to perform the browser based authentication of the user which then allows Postman to capture the access token.
- Configure a sample request which invokes the WebAPI using the captured access token.
For the basis of this post let’s assume you’ve already installed Postman and have created an appropriate account or subscription and you are logged in.
Step 1 - create application registration for Postman
-
Login to your Azure tenant portal
-
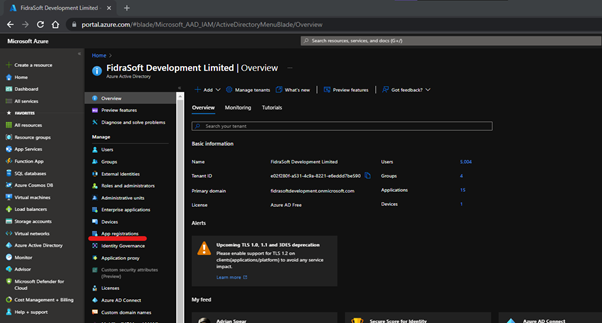
Click on ‘Azure Active Directory’ to open the Azure Active Directory blade:

-
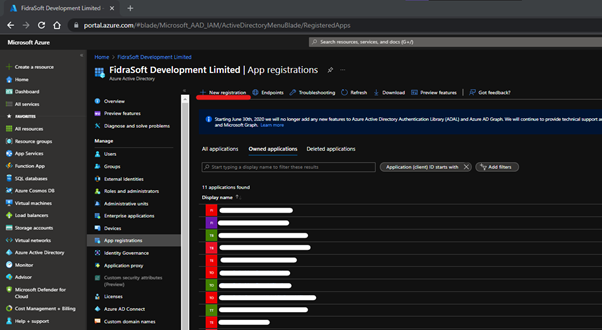
Click on the ‘App Registrations’ from the nav menu to open the Application Registrations blade.
-
Click on 'New Registration':
-
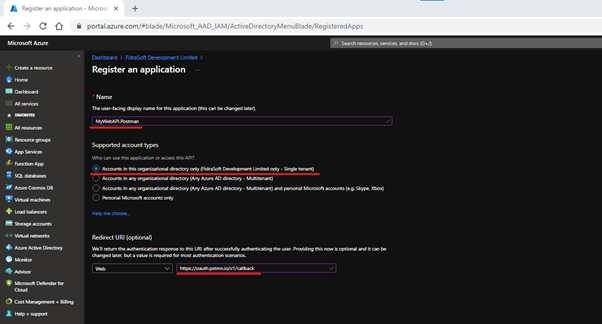
Give your application a name. e.g. MyWebAPI.Postman.
-
Select 'Accounts organisation only’.
-
Add the following redirect uri: 'https://oauth.pstmn.io/v1/callback' and click ‘Register’. This will register the application and then open the Application Registration blade for the application:
-
Click ‘Certificates & Secrets’. Create a client secret – make a note of the value, you’ll need it later.
-
Click ‘API Permissions’ and ‘Add a permission’. Select ‘My APIs’ and choose your WebAPI – select ‘Delegated Permissions’ and then the permission scope you wish to add. Click ‘Add permissions’ to return to the blade.
-
Grant Administrative consent for the permissions on behalf of all users.
Step 2 - configure authentication options in Postman
Postman offers various ways to use authentication options – for this post we’re going to create a new workspace and configure the authentication token on the workspace and inherit the token for all requests we create within the workspace. In this way, we can refresh the token when it expires just once rather than for every request we want to test.
Postman includes lots of great documentation on workspaces and how to organise your requests and so on – I recommend it.
In Postman, using the workspace of your choice, create a new collection and give it a name. e.g. ‘MyWebAPI’.
On the ‘Authorization’ tab – select ‘OAuth 2.0’ and ‘Add auth data to’ set to ‘Request Headers’.
Current Token section – leave as default:

In the ‘Configure New Token section’ – select ‘Edit Token Configuration’ – this will enable the fields below for editing.
Change ‘Grant Type’ to ‘Authorization Code’.
Check ‘Authorize using Browser’.
Set ‘Auth Url’ – use the value from the ‘OAuth 2.0 authorization endpoint (v2)’ field in the ‘Overview’ ‘Endpoints’ page of the Application Registration for Postman.
Set ‘Access Token Url’ – use the value from the ‘OAuth 2.0 token endpoint (v2)’ field in the ‘Overview’ ‘Endpoints’ page of the Application Registration for Postman:

Set ‘Client ID’ and ‘Client Secret’ fields using the application id from the ‘Overview’ page of the Application Registration for Postman. The secret you should have noted earlier – if not, and it’s no longer readable, delete it and create a new one.
Set ‘Scope’ to the API Permission added to the Application Registration for Postman. It should be in the form of ‘api://<guid>/<scope>’ e.g. ‘api://12345678-1234-5678-1234-123456789101/License.Read’.
Set ‘Client Authentication’ to ‘Send as Basic Auth Header’.
Click the ‘Get New Access Token’ button – this should launch the browser requesting you to login. Use the credentials of the user you wish to test. Successfully logging in will display a popup window asking to open the Token in Postman. Click yes and then use the token in Postman:

Summary
That’s it – you’re done!
In this post, we configured an Azure Active Directory application registration to secure your WebAPI using delegated permissions and scopes for users within your organisation only.
Additional Resources
Contact Us or follow us on LinkedIn.